Time to spice up your color changes! You're going to learn how to animate background color changes in SwiftUI using Paths and AnimatableData!
Getting Started
The key to our background color changing magic is going to be creating our own custom SwiftUI Shape struct. We'll call it SplashShape. Shape structs utilize the function path(in rect: CGRect) -> Path to define what they look like. This is the function we'll be using to create the various animations.
Create the SplashShape struct
Go ahead and create a new Shape struct called SplashStruct.
import SwiftUI

struct SplashShape: Shape {

    func path(in rect: CGRect) -> Path {
        return Path()
    }
}
For starters we'll be creating two animations. leftToRight and rightToLeft shown below.
leftToRight & rightToLeftSplashAnimation
We will create an enum called SplashAnimation for our custom animations. This will allow us to easily add more animations in the future (see the end for more!).
import SwiftUI

struct SplashShape: Shape {

    public enum SplashAnimation {
        case leftToRight
        case rightToleft
    }

    func path(in rect: CGRect) -> Path {
        return Path()
    }
}
In our path() function we'll switch on which animation our shape is using and generate the required Path for the animation. But first we must create variables to hold the animation type as well as progress of the aniamtion.
import SwiftUI

struct SplashShape: Shape {

    public enum SplashAnimation {
        case leftToRight
        case rightToleft
    }

    var progress: CGFloat
    var animationType: SplashAnimation

    func path(in rect: CGRect) -> Path {
        return Path()
    }
}
progress will be a value between 0 and 1, which will detail how far we are through the animation of the color change. This will come in handy next when we write our path() function.
Writing the path() function
As said earlier we need to figure out what type of animation we're using in order to return the correct Path. Start off by writing a switch statement in your path() function using the animationType defined earlier.
func path(in rect: CGRect) -> Path {
   switch animationType {
       case .leftToRight:
           return Path()
       case .rightToLeft:
           return Path()
   }
}
As of right now this will return empty paths. We need to actually create the functions to animate the paths.
Create The Animation Functions
Below your path() function, create two new functions called leftToRight() and rightToLeft() for each type of animation. Within each function we will create a Path in the shape of a rectangle that will grow over time according to our progress variable.
func leftToRight(rect: CGRect) -> Path {
    var path = Path()
    path.move(to: CGPoint(x: 0, y: 0)) // Top Left
    path.addLine(to: CGPoint(x: rect.width * progress, y: 0)) // Top Right
    path.addLine(to: CGPoint(x: rect.width * progress, y: rect.height)) // Bottom Right
    path.addLine(to: CGPoint(x: 0, y: rect.height)) // Bottom Left
    path.closeSubpath() // Close the Path
    return path
}

func rightToLeft(rect: CGRect) -> Path {
    var path = Path()
    path.move(to: CGPoint(x: rect.width, y: 0))
    path.addLine(to: CGPoint(x: rect.width - (rect.width * progress), y: 0))
    path.addLine(to: CGPoint(x: rect.width - (rect.width * progress), y: rect.height))
    path.addLine(to: CGPoint(x: rect.width, y: rect.height))
    path.closeSubpath()
    return path
}
Then utilize the two new functions in your path() function above.
func path(in rect: CGRect) -> Path {
   switch animationType {
       case .leftToRight:
           return leftToRight(rect: rect)
       case .rightToLeft:
           return rightToLeft(rect: rect)
   }
}
AnimatableData
In order to make sure Swift knows how to animate our Shape when the progress variable is changed, we need to specify which variable is animating. Just below our progress and animationType variables, define animatableData. It's a variable based on the Animatable protocol which helps SwiftUI know how to animate views when they change.
var progress: CGFloat
var animationType: SplashAnimation

var animatableData: CGFloat {
    get { return progress }
    set { self.progress = newValue}
}
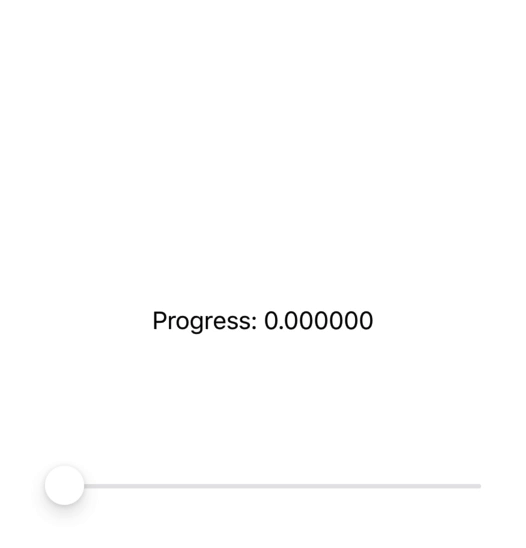
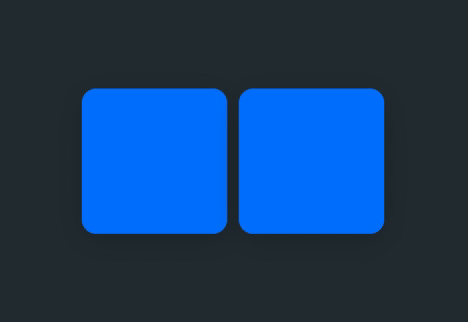
SplashShape animating as progress changes.Animating the Color Change
Up to now we've created a Shape which will animate over time. Next we need to add this shape to a view and automatically animate it when the view's color changes. This is where SplashView comes in to play. We're going to create a SplashView to automatically update the progress variable of SplashShape. When SplashView receives a new Color it triggers the animation.
Get started by creating the SplashView struct.
import SwiftUI

struct SplashView: View {

    var body: some View {
        // SplashShape Here
    }

}
Remember our SplashShape takes a SplashAnimation enum as a parameter so we'll need to add this as a parameter to our SplashView. In addition, we're animating the background color change of the view, so we'll need to take in a Color as well. Our initializer is detailed below.
ColorStore is a custom ObservableObject. It is used to recieve Color updates in the SplashView struct, so that we can initiate the SplashShape animation, and ultimately the background color change. We'll show how that works in a second.
struct SplashView: View {

    var animationType: SplashShape.SplashAnimation
    @State private var prevColor: Color // Stores background color
    @ObservedObject var colorStore: ColorStore // Send new color updates


    init(animationType: SplashShape.SplashAnimation, color: Color) {
        self.animationType = animationType
        self._prevColor = State<Color>(initialValue: color)
        self.colorStore = ColorStore(color: color)
    }

    var body: some View {
        // SplashShape Here
    }

}

class ColorStore: ObservableObject {
    @Published var color: Color

    init(color: Color) {
        self.color = color
    }
}
Creating the SplashView body
Inside the body variable we need to return a Rectangle set to the current color of the SplashView. Then using the ColorStore Obseravble Object defined earlier, we can receive color updates to animate our view.
var body: some View {
    Rectangle()
        .foregroundColor(self.prevColor) // Current Color
        .onReceive(self.colorStore.$color) { color in
            // Animate Color Update Here
        }
}
When changing the colors, we need some way to keep track of the color that the SplashView is being changed to, as well as the progress. We'll define the layers variable in order to do this.
@State var layers: [(Color,CGFloat)] = [] // New Color & Progress
Now back inside our body variable we need to add the newly received Colors to the layers variable. When we add them, we set the progress to 0 since they were just added. Then, over the course of half a second we animate their progress to 1.
var body: some View {
    Rectangle()
        .foregroundColor(self.prevColor) // Current Color
        .onReceive(self.colorStore.$color) { color in
            // Animate Color Update Here
            self.layers.append((color, 0))

            withAnimation(.easeInOut(duration: 0.5)) {
                self.layers[self.layers.count-1].1 = 1.0
            }
        }
}
As of right now, this will add the new colors to the layers variable, but they aren't displayed on top of the SplashView. To do this we need to display each layer as an overlay on the Rectangle inside the body variable.
var body: some View {
    Rectangle()
        .foregroundColor(self.prevColor)
        .overlay(
            ZStack {
                ForEach(layers.indices, id: \.self) { x in
                    SplashShape(progress: self.layers[x].1, animationType: self.animationType)
                        .foregroundColor(self.layers[x].0)
                }

            }

            , alignment: .leading)
        .onReceive(self.colorStore.$color) { color in
            // Animate color update here
            self.layers.append((color, 0))

            withAnimation(.easeInOut(duration: 0.5)) {
                self.layers[self.layers.count-1].1 = 1.0
            }
        }
}
Give it a Run
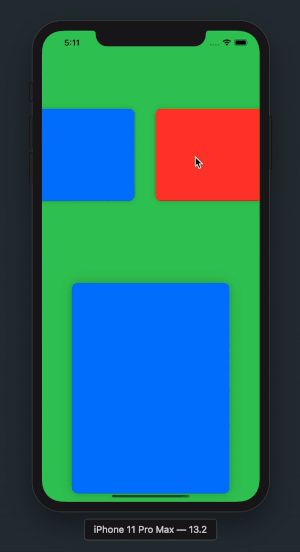
Using the code below you can give it a run inside an emulator. What this does, is when the button inside ContentView is pressed, it advances the index used to select the SplashView color, which triggers an update to the ColorStore inside. This make the SplashView add a SplashShape layer and animate it's addition to the view.
import SwiftUI
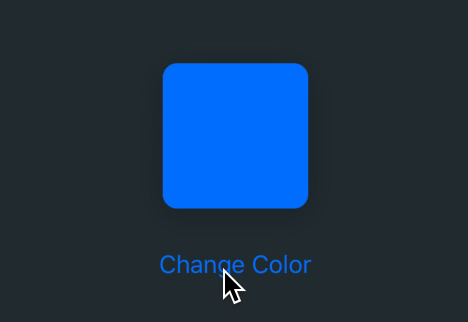
struct ContentView: View {
var colors: [Color] = [.blue, .red, .green, .orange]
@State var index: Int = 0
@State var progress: CGFloat = 0
var body: some View {
VStack {
SplashView(animationType: .leftToRight, color: self.colors[self.index])
.frame(width: 200, height: 100, alignment: .center)
.cornerRadius(10)
.shadow(color: Color.black.opacity(0.2), radius: 10, x: 0, y: 4)
Button(action: {
self.index = (self.index + 1) % self.colors.count
}) {
Text("Change Color")
}
.padding(.top, 20)
}
}
}
Not Finished Yet!
We're missing one thing. AS of right now, we're continuously adding layer upon layer to our SplashView. We need to make sure we delete those layers after they finish animating and are displayed.
Inside your onReceive() function inside your SplashView struct's body variable, make the following change:
.onReceive(self.colorStore.$color) { color in
    self.layers.append((color, 0))

    withAnimation(.easeInOut(duration: 0.5)) {
        self.layers[self.layers.count-1].1 = 1.0
        DispatchQueue.main.asyncAfter(deadline: .now() + 0.5) {
            self.prevColor = self.layers[0].0 // Finalizes background color of SplashView
            self.layers.remove(at: 0) // removes itself from layers array
        }
    }
}
This makes sure we delete old entries to the layers array and that our SplashView is showing the correct background color based on the latest update.
Show us What You Made!
Have you completed one of our tutorials? Send us a screenshot or drop us a link to the project. We'll be featuring user's finished work on our website. Find us on Twitter @TrailingClosure, or email us at [email protected]
Source Code Posted on GitHub
Checkout the source code for this tutorial on my Github! Full source code for both SplashShape and SplashView are included, in addition to the examples shown. .... But wait, there's more!
EXTRA CREDIT!
If you're familiar with this blog, you know we love our extra credit 😉. I said in the beginning there would be more animations. This is the moment you've been waiting for.... drum roll....
SplashAnimation 🥳
Wooohoo!! Remember this? I told you we'd come back to it to add more animation types.
enum SplashAnimation {
    case leftToRight
    case rightToLeft
    case topToBottom
    case bottomToTop
    case angle(Angle)
    case circle
}

func path(in rect: CGRect) -> Path {

    switch self.animationType {
        case .leftToRight:
            return leftToRight(rect: rect)
        case .rightToLeft:
            return rightToLeft(rect: rect)
        case .topToBottom:
            return topToBottom(rect: rect)
        case .bottomToTop:
            return bottomToTop(rect: rect)
        case .angle(let splashAngle):
            return angle(rect: rect, angle: splashAngle)
        case .circle:
            return circle(rect: rect)
    }

}
I know what you're thinking... "Whoa, that's a lot of extra credit...". Don't fret. By modifying our path() function inside SplashShape, and creating just a few more functions, we'll be animating like no one's business.
Let's take this animation by animation...
topToBottom & bottomToTop
Much like leftToRight and rightToLeft these functions create a path which starts from the bottom or top of the shape and grows over time using the progress variable.
func topToBottom(rect: CGRect) -> Path {
    var path = Path()
    path.move(to: CGPoint(x: 0, y: 0))
    path.addLine(to: CGPoint(x: rect.width, y: 0))
    path.addLine(to: CGPoint(x: rect.width, y: rect.height * progress))
    path.addLine(to: CGPoint(x: 0, y: rect.height * progress))
    path.closeSubpath()
    return path
}

func bottomToTop(rect: CGRect) -> Path {
    var path = Path()
    path.move(to: CGPoint(x: 0, y: rect.height))
    path.addLine(to: CGPoint(x: rect.width, y: rect.height))
    path.addLine(to: CGPoint(x: rect.width, y: rect.height - (rect.height * progress)))
    path.addLine(to: CGPoint(x: 0, y: rect.height - (rect.height * progress)))
    path.closeSubpath()
    return path
}
circle
If you remember some of your grade school geometry, you'll know the Pythagorean Theorem. a^2 + b^2 = c^2
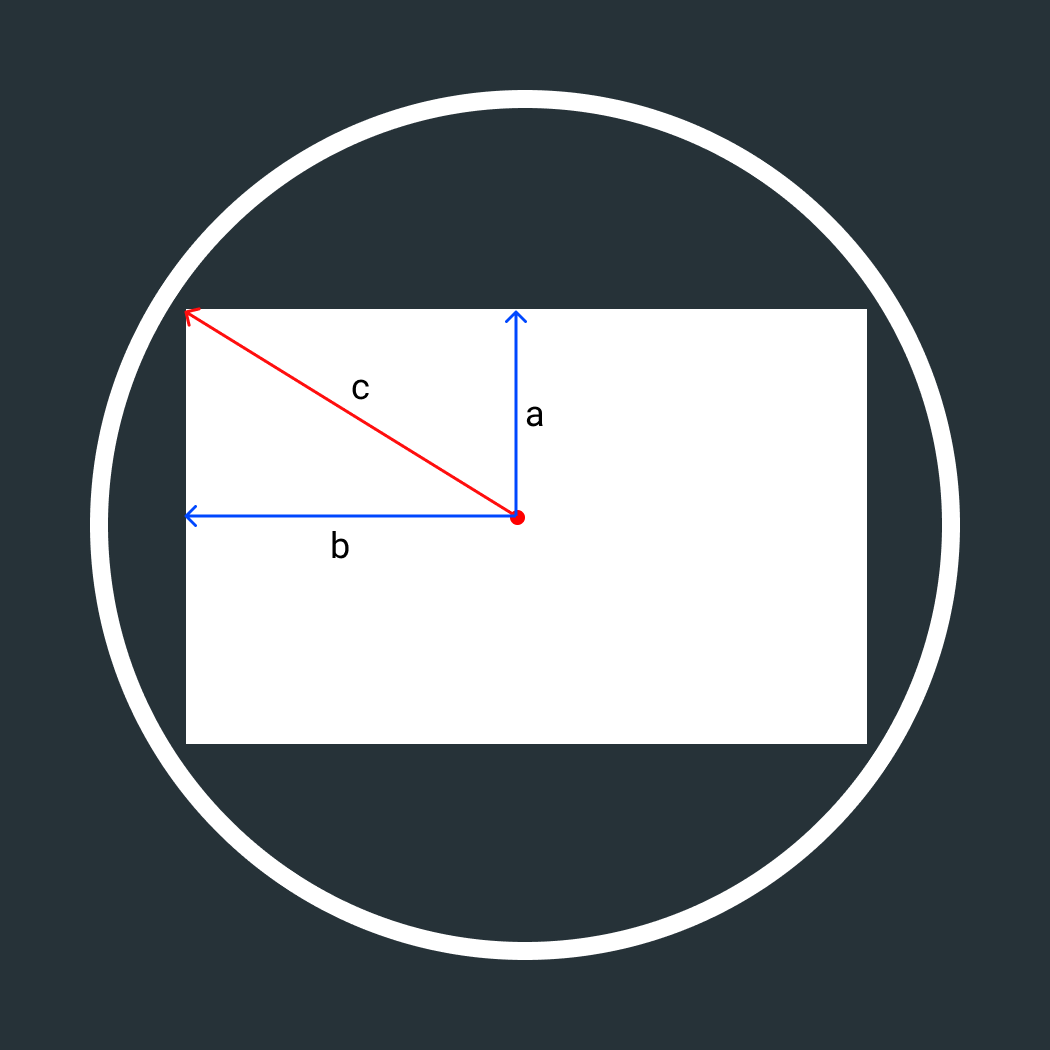
c is the radius of the final circle our path needs to drawa and b can be considered our rectangle's height and width. This allows us to solve for c, the radius of the circle that is required to cover the entirety of the rectangle. We can build the circular path from this and grow it over time using the progress variable.
func circle(rect: CGRect) -> Path {
    let a: CGFloat = rect.height / 2.0
    let b: CGFloat = rect.width / 2.0

    let c = pow(pow(a, 2) + pow(b, 2), 0.5) // a^2 + b^2 = c^2  --> Solved for 'c'
    // c = radius of final circle

    let radius = c * progress
    // Build Circle Path
    var path = Path()
    path.addArc(center: CGPoint(x: rect.midX, y: rect.midY), radius: radius, startAngle: Angle(degrees: 0), endAngle: Angle(degrees: 360), clockwise: true)
    return path

}
angle
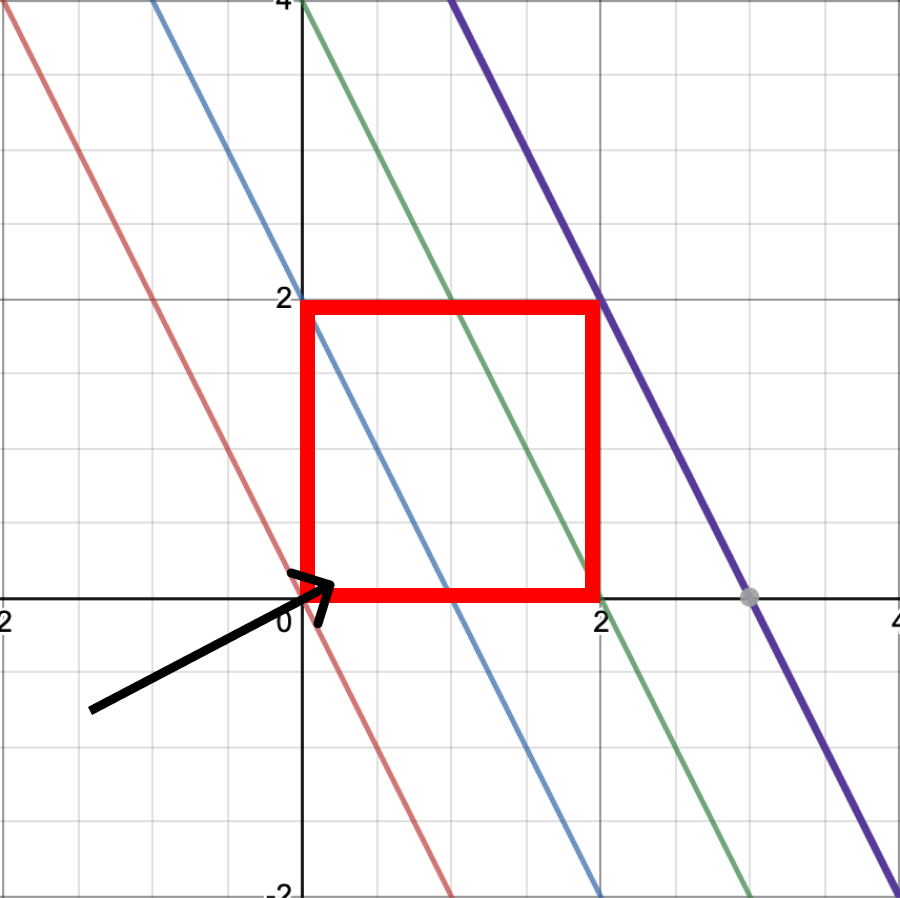
This one is a little more involved. You need to calculate the slope of the angle using the tangent. Then create a line with the given slope. You'll plot this line as a right triangle as you move the line across the rectangle. See the picture below. The various colored lines represent the line moving over time to cover the entire rectangle.
The function is as follows:
func angle(rect: CGRect, angle: Angle) -> Path {

    var cAngle = Angle(degrees: angle.degrees.truncatingRemainder(dividingBy: 90))

    // Return Path Using Other Animations (topToBottom, leftToRight, etc) if angle is 0, 90, 180, 270
    if angle.degrees == 0 || cAngle.degrees == 0 { return leftToRight(rect: rect)}
    else if angle.degrees == 90 || cAngle.degrees == 90 { return topToBottom(rect: rect)}
    else if angle.degrees == 180 || cAngle.degrees == 180 { return rightToLeft(rect: rect)}
    else if angle.degrees == 270 || cAngle.degrees == 270 { return bottomToTop(rect: rect)}


    // Calculate Slope of Line and inverse slope
    let m = CGFloat(tan(cAngle.radians))
    let m_1 = pow(m, -1) * -1
    let h = rect.height
    let w = rect.width

    // tan (angle) = slope of line
    // y = mx + b ---> b = y - mx   ~ 'b' = y intercept
    let b = h - (m_1 * w) // b = y - (m * x)

    // X and Y coordinate calculation
    var x = b * m * progress
    var y = b * progress

    // Triangle Offset Calculation
    let xOffset = (angle.degrees > 90 && angle.degrees < 270) ? rect.width : 0
    let yOffset = (angle.degrees > 180 && angle.degrees < 360) ? rect.height : 0

    // Modify which side the triangle is drawn from depending on the angle
    if angle.degrees > 90 && angle.degrees < 180 { x *= -1 }
    else if angle.degrees > 180 && angle.degrees < 270 { x *= -1; y *= -1 }
    else if angle.degrees > 270 && angle.degrees < 360 { y *= -1 }

    // Build Triangle Path
    var path = Path()
    path.move(to: CGPoint(x: xOffset, y: yOffset))
    path.addLine(to: CGPoint(x: xOffset + x, y: yOffset))
    path.addLine(to: CGPoint(x: xOffset, y: yOffset + y))
    path.closeSubpath()
    return path

}
Support Future Tutorials Like This One!
Please consider subscribing using this link. If you aren't reading this on TrailingClosure.com, please come check us out sometime!
If you've built something using this tutorial, send us pics! Find us on Twitter @TrailingClosure, or email us at [email protected]