I was scrolling through various websites the other day and took note of the slanted card and layout designs many popular websites have. Some examples are Stripe, TailwindUI, and Firebase. I brought this design over to SwiftUI using a custom Parallelogram Shape. Before we dive-in to the tutorial here, take a look below at some examples of what you can make.
Before getting started, please consider subscribing using this link, and if you aren't reading this on TrailingClosure.com, please come check us out sometime!

Getting Started
If you haven't already, go ahead and fire up Xcode and create a new project. From there you'll need to create a new file named Parallelogram.swift. This will be the file we'll store our custom Shape struct in.
If you haven't built your own
Shapebefore, checkout this great article on Hacking With Swift. Paul will go over the basics to get you caught up to speed.
import SwiftUI
struct Parallelogram: Shape {
func path(in rect: CGRect) -> Path {
// Return Custom Path Here
}
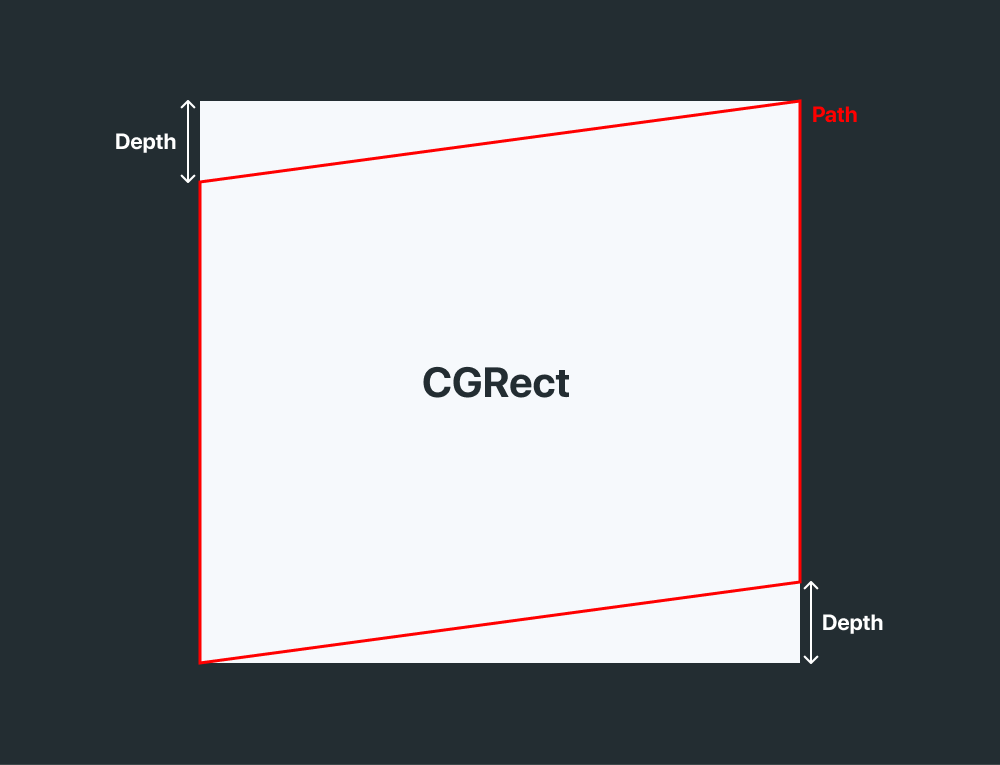
}Take a look at the diagram below, in order to see how this shape is going to work. A CGRect is going to be passed into the Shape's path(in rect:) function, and from there we'll draw a Path utilizing a struct property we'll create in a second called depth.
- Start off by declaring a
CGFloatproperty inside the struct calleddepth. This is going to be how far our parallelogram shape will "cut" into theCGRect.
import SwiftUI

struct Parallelogram: Shape {

    var depth: CGFloat

    func path(in rect: CGRect) -> Path {
    	// Return Custom Path Here
    }
}
2. Now inside the path(in rect:) function, define a new Path for us to draw the parallelogram shape in.
import SwiftUI

struct Parallelogram: Shape {

    var depth: CGFloat

    func path(in rect: CGRect) -> Path {
    	Path { p in
        	// Draw parallelogram here using 'p'
        }
    }
}
3. Next we're going to draw the path. Remember that we need to draw this path relative to the rect passed in and not one standard size. This will allow the shape to scale relative to the size of the view it's placed in.
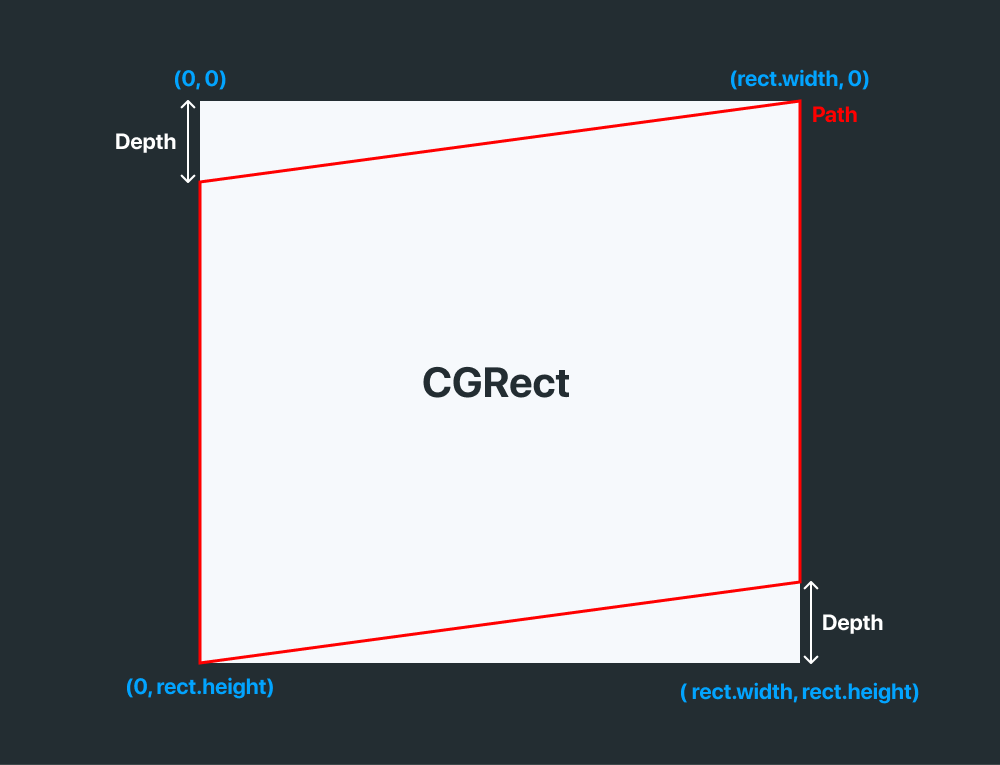
Remembering our digram from above, we'll start at the top left of the shape and move around clockwise.
import SwiftUI

struct Parallelogram: Shape {

    var depth: CGFloat
    var flipped: Bool = false

    func path(in rect: CGRect) -> Path {
        Path { p in
        	p.move(to: CGPoint(x: 0, y: depth))
            p.addLine(to: CGPoint(x: rect.width, y: 0))
            p.addLine(to: CGPoint(x: rect.width, y: rect.height - depth))
            p.addLine(to: CGPoint(x: 0, y: rect.height))
            p.closeSubpath()
        }
    }
}
If you'd like, you may also add a variable to the Parallelogram shape which allows you to flip the shape horizontally when drawing the path. This makes it a little easier than having to use a .rotation3DEffect() call on the shape after you create it.
import SwiftUI

struct Parallelogram: Shape {

    var depth: CGFloat
    var flipped: Bool = false

    func path(in rect: CGRect) -> Path {
        Path { p in
            if flipped {
                p.move(to: CGPoint(x: 0, y: 0))
                p.addLine(to: CGPoint(x: rect.width, y: depth))
                p.addLine(to: CGPoint(x: rect.width, y: rect.height))
                p.addLine(to: CGPoint(x: 0, y: rect.height - depth))
            } else {
                p.move(to: CGPoint(x: 0, y: depth))
                p.addLine(to: CGPoint(x: rect.width, y: 0))
                p.addLine(to: CGPoint(x: rect.width, y: rect.height - depth))
                p.addLine(to: CGPoint(x: 0, y: rect.height))
            }
            p.closeSubpath()
        }
    }
}
Example Use
Like some of the example above, you can easily mask off an Image or View using the shape like so:
Image("watch_stock")
    .resizable()
    .aspectRatio(contentMode: .fill)
    .frame(height: 300, alignment: .center)
    .mask(Parallelogram(depth: 50))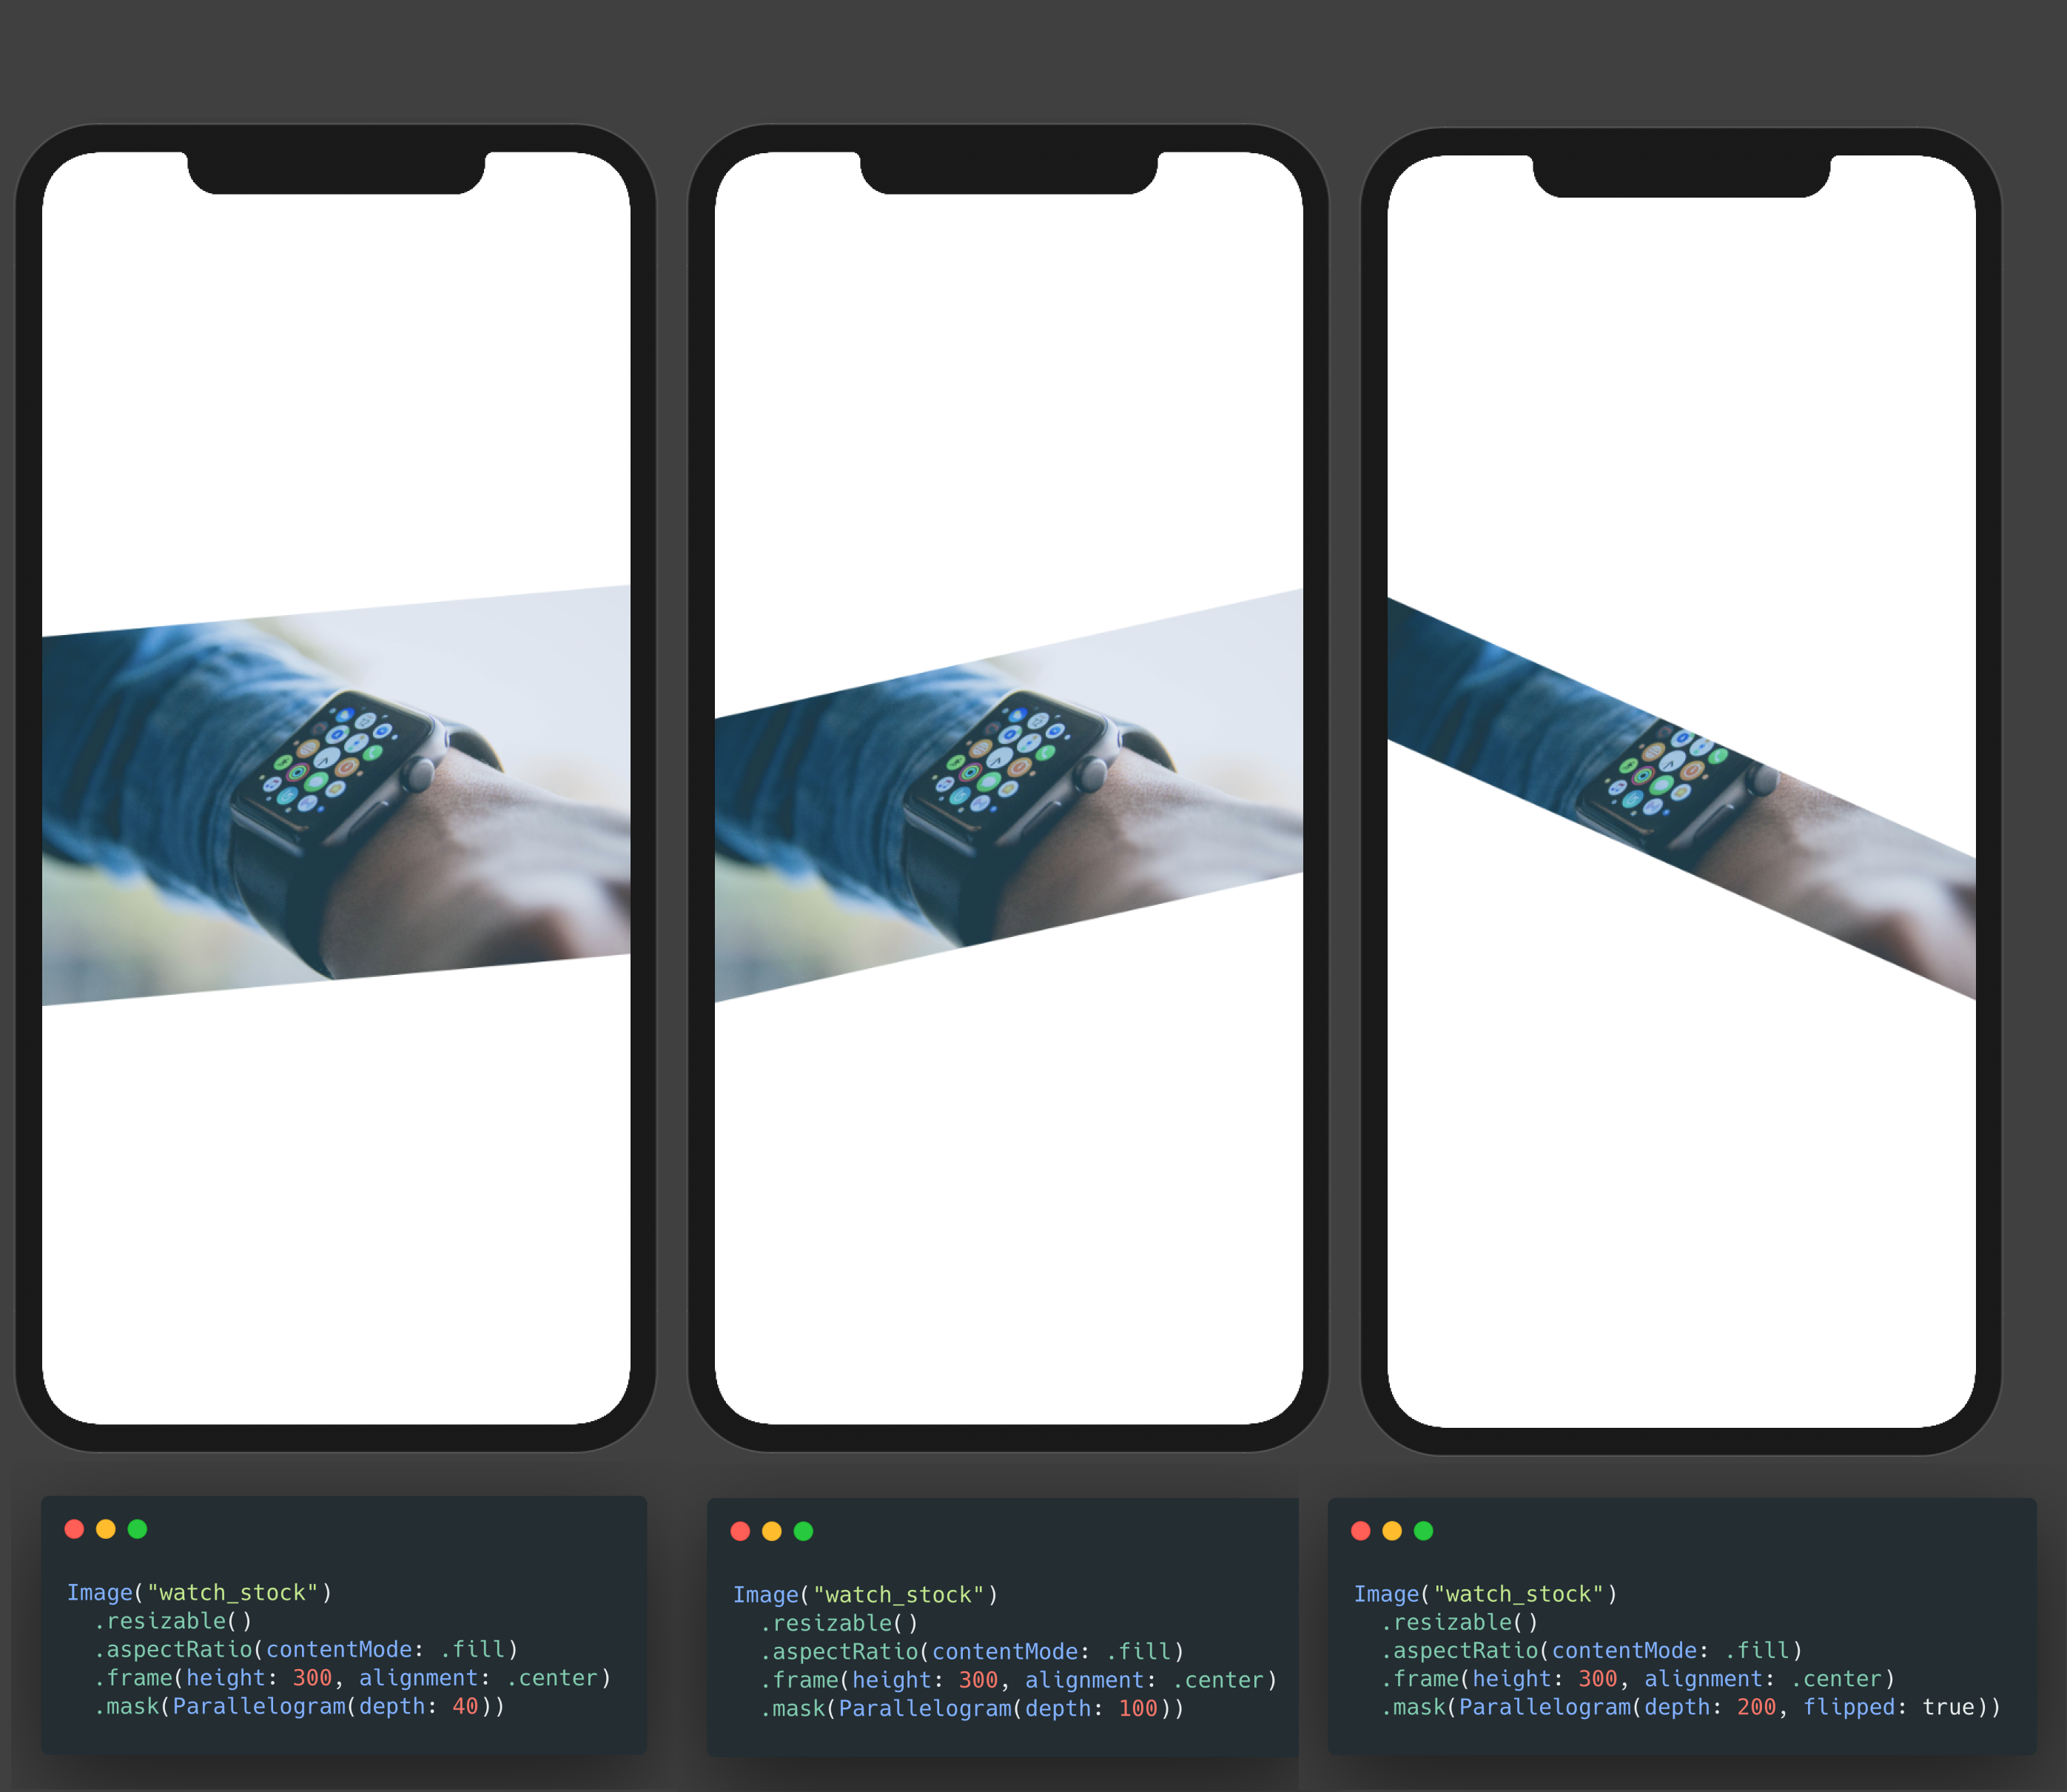
Using with a Matched Geometry Effect
The best part is you can use this shape with many other SwiftUI features such as Matched Geometry Effect. Notice in the video below how the cover photo removes its mask as it presents itself when tapped.
Show us what you've made!
We want to see what you've made using this tutorial! Send us pics! Find us on Twitter @TrailingClosure, on Instagram, or email us at [email protected].