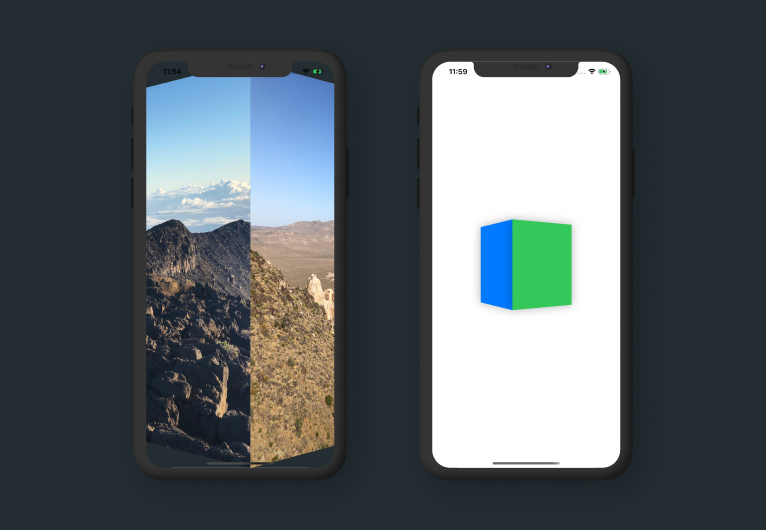
Today we're going to cover how to create a custom AnyTransition that looks like a cube rotating. Take a look at the video below.
Before getting started, please consider subscribing using this link, and if you aren't reading this on TrailingClosure.com, please come check us out sometime!
Creating a custom AnimatableModifier
Start off by defining a new AnimatableModifier called CubeRotationModifier. Inside, define a new Double called pct which we will use as our animatableData to animate the transition.
import SwiftUI

struct CubeRotationModifier: AnimatableModifier {

    var pct: Double

    var animatableData: Double {
        get { pct }
        set { pct = newValue }
    }

    func body(content: Content) -> some View {
        content
    }
}
Rotating The View
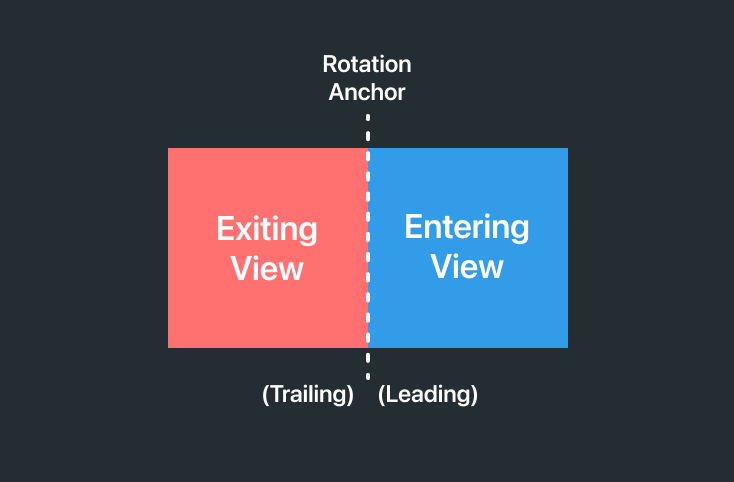
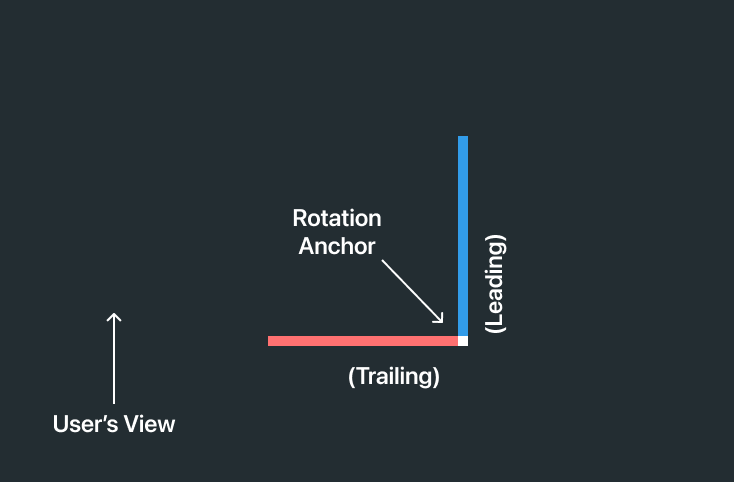
Next up we need to perform a 3D rotation of the view along the y-axis. The anchor of rotation depends on which direction the view is coming from (entering or exiting). The two diagrams below may help clear any confusion.
To distinguish a view as entering or exiting, we're going to create an enum called SlideDirection. Then we'll use the enum to define a property called direction that will define which rotation animation we'll use.
struct CubeRotationModifier: AnimatableModifier {

    enum SlideDirection {
        case enter
        case exit
    }

    var pct: Double
    var direction: SlideDirection

    var animatableData: Double {
        get { pct }
        set { pct = newValue }
    }

    func body(content: Content) -> some View {
        content
    }
}
Now to apply the .rotation3DEffect() to the view.
func body(content: Content) -> some View {
    content
        .rotation3DEffect(
            Angle(degrees: calcRotation()),
            axis: (x: 0.0, y: 1.0, z: 0.0),
            anchor: direction == .enter ? .leading : .trailing,
            anchorZ: 0,
            perspective: 0.1
        )
}

func calcRotation() -> Double {
    if direction == .enter {
        return 90 - (pct * 90)
    } else {
        return -1 * (pct * 90)
    }
}
As you can see depending on the SlideDirection we apply a different Angle and UnitPoint (Anchor).
- The entering view starts at
90and works its way to0 - The exiting view starts at
0and works its way to-90
If you run this now, then you might see some funky animation. This is because we haven't translated the view's x position on the screen. Right now they are rotating in their starting position, on top of one another.
Translating Views
In order to translate the views to the correct x distance, we need to grab a reference to the frame. We do this through wrapping our content in a GeometryReader and using the GeometryProxy it passes in.
func body(content: Content) -> some View {
    GeometryReader { geo in
        content
            .rotation3DEffect(
                Angle(degrees: calcRotation()),
                axis: (x: 0.0, y: 1.0, z: 0.0),
                anchor: direction == .enter ? .leading : .trailing,
                anchorZ: 0,
                perspective: 0.1
            ).transformEffect(.init(translationX: calcTranslation(geo: geo), y: 0))
    }
}

func calcTranslation(geo: GeometryProxy) -> CGFloat {
    if direction == .enter {
        return geo.size.width - (CGFloat(pct) * geo.size.width)
    } else {
        return -1 * (CGFloat(pct) * geo.size.width)
    }
}
Similar to above, translating the view along the x axis depends on which direction the view is moving.
- The entering view starts at an
xposition equal to itswidthand translates to0. - The exiting view starts at an
xposition equal to0and translates towidth * -1
Extending AnyTransition
Before we can use the modifier we need to extend AnyTransition to take the CubeRotationModifier and transform it into a transition to use on our views.
Notice how the transition is asymmetric. The direction is modified on enter and exit in order to make sure the view rotates the correct way off/on screen.
extension AnyTransition {
    static var cubeRotation: AnyTransition {
        get {
            AnyTransition.asymmetric(
                insertion: AnyTransition.modifier(active: CubeRotationModifier(pct: 0, direction: .enter), identity: CubeRotationModifier(pct: 1, direction: .enter)),
                removal: AnyTransition.modifier(active: CubeRotationModifier(pct: 1, direction: .exit), identity: CubeRotationModifier(pct: 0, direction: .exit)))
        }
    }
}
Example Test Run
Take the code below and run it on your emulator or on a real device. You will see the .cubeSlide transition in action as a cube of colors rotates on screen.
import SwiftUI

struct ContentView: View {

    @State var index: Int = 0
    @State var timer = Timer.publish(every: 2, on: RunLoop.main, in: RunLoop.Mode.common).autoconnect()
    var colors: [Color] = [Color.red, Color.blue, Color.green, Color.orange, Color.purple]


    var body: some View {
        ZStack {
            ForEach(colors.indices) { i in
                if index == i {
                    colors[i]
                        .transition(.cubeRotation)
                }
            }

        }
        .frame(width: 200, height: 200, alignment: .center)
        .onReceive(timer) { _ in
            withAnimation(.easeInOut(duration: 1.3)) {
                index = (index + 1) % colors.count
            }
        }

    }
}
Show us what you've made!
We want to see what you've made using this tutorial! Send us pics! Find us on Twitter @TrailingClosure, on Instagram, or email us at [email protected].