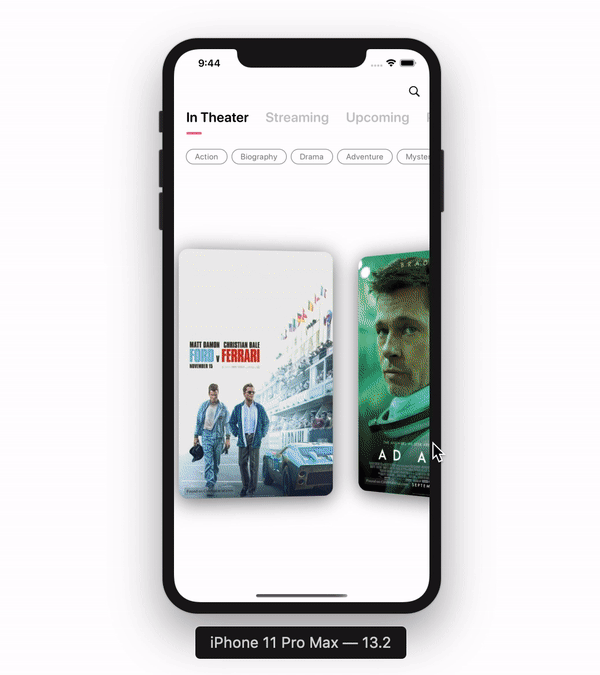
Here's a look at the kind of 3D scroll effect we'll be making today. At the end of this tutorial you'll be able to add this 3D effect to any custom SwiftUI view in your app. Let's get started!
Before getting started, please consider subscribing using this link, and if you aren't reading this on TrailingClosure.com, please come check us out sometime!
Getting Started
Start by creating a new SwiftUI View. For example purposes I'll be showing a list of rectangles in different colors, so I named my view ColorList.
import SwiftUI

struct ColorList: View {
    var body: some View {
        Text("Hello, World!")
    }
}

struct ColorList_Previews: PreviewProvider {
    static var previews: some View {
        ColorList()
    }
}
Color Data
At the top of your view struct, add a variable for keeping track of colors.
var colors: [Colors]
Making the List
Inside your body variable, get rid of the placeholder Text. Add in a HStack wrapping in a ScrollView like this.
var body: some View {
    ScrollView(.horizontal, showsIndicators: false) {
        HStack(alignment: .center, spacing: 50) {

        }
    }
}
Show the Rectangles
Inside your HStack we need to show a Rectangle for each color stored in colors. For this we'll use a ForEach. I've gone ahead and modified the frame for the rectangle to something more relatable to a traditional UI Card.
var body: some View {
    ScrollView(.horizontal, showsIndicators: false) {
        HStack(alignment: .center, spacing: 20) {
            ForEach(colors, id: \.self) { color in
                Rectangle()
                    .foregroundColor(color)
                    .frame(width: 200, height: 300, alignment: .center)
            }
        }
    }
}
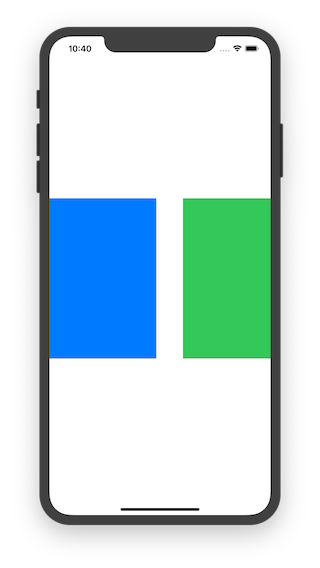
And if you go ahead and provide the preview struct with a list of colors like this:
struct ColorList_Previews: PreviewProvider {
    static var previews: some View {
        ColorList(colors: [.blue, .green, .orange, .red, .gray, .pink, .yellow])
    }
}
You should see this!
Adding the 3D Effect
Start by wrapping your Rectangle in a GeometryReader. This will allow us to grab a reference to the frame of the Rectangle as it moves across the screen.
var body: some View {
    ScrollView(.horizontal, showsIndicators: false) {
        HStack(alignment: .center, spacing: 230) {
            ForEach(colors, id: \.self) { color in
                GeometryReader { geometry in
                    Rectangle()
                        .foregroundColor(color)
                        .frame(width: 200, height: 300, alignment: .center)
                }
            }
        }
    }
}
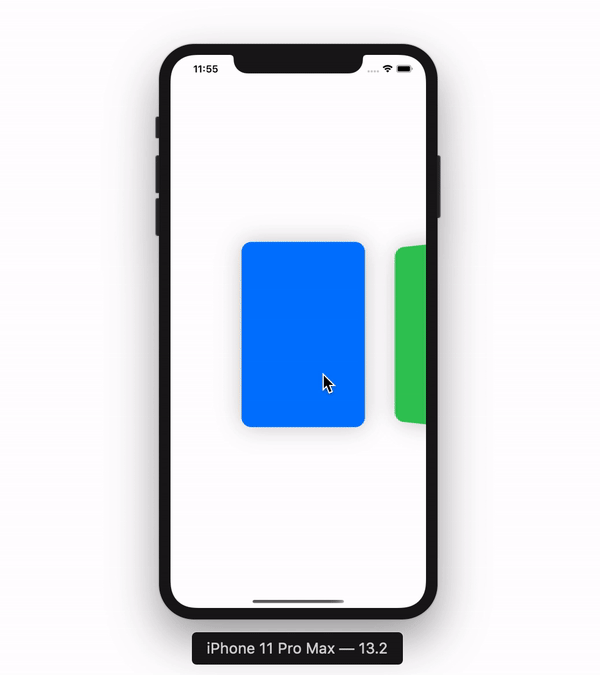
You will need to change the HStack spacing you defined above, due to the way GeometryReader works.
Then add this line to your Rectangle
.rotation3DEffect(Angle(degrees: (Double(geometry.frame(in: .global).minX) - 210) / -20), axis: (x: 0, y: 1.0, z: 0))
The Angle you're passing into the function is changing as the Rectangle moves across the screen. Take a particular look at the .frame(in:) function. It allows you to grab the CGRect of the Rectangle and uses its minX coordinate for angle calculations.
The axis parameter is a Tuple that details which axis to modify using the angle you just passed in. In this case it's the Y-axis.
The documentation for the rotation3DEffect() can be found here on Apple's Official Website.
If you go ahead and run the example you should see your Rectangles rotating as they move across the screen!
I've also modified the corner radius of the rectangle as well as added a drop shadow to make it look a little better.
Final Product
struct ColorList: View {

    var colors:[Color]

    var body: some View {
        ScrollView(.horizontal, showsIndicators: false) {
            HStack(alignment: .center, spacing: 230) {
                ForEach(colors, id: \.self) { color in
                    GeometryReader { geometry in
                        Rectangle()
                            .foregroundColor(color)
                            .frame(width: 200, height: 300, alignment: .center)
                            .cornerRadius(16)
                            .shadow(color: Color.black.opacity(0.2), radius: 20, x: 0, y: 0)
                            .rotation3DEffect(Angle(degrees: (Double(geometry.frame(in: .global).minX) - 210) / -20), axis: (x: 0, y: 1.0, z: 0))
                    }
                }
            }.padding(.horizontal, 210)
        }
    }
}
That's all Folks!
If you enjoyed this post, please consider subscribing to my website using this link, and if you aren't reading this on TrailingClosure.com, please come check us out sometime!