Give any SwiftUI View the ability to be "Liked"! This short tutorial walks you through the process of creating a custom popup with gestures and animations. You'll then extend this ViewModifier to allow it to be used by any View in your project.
Getting Started
- Start by creating a new file
LikeModifier.swift - Add in the basic
ViewModifierstub from below. As of right now this will just return the content as is when we add the modifier to our view.
import SwiftUI

struct LikeModifier: ViewModifier {

    func body(content: Content) -> some View {
        content
    }

}
Creating the "Like" Overlay

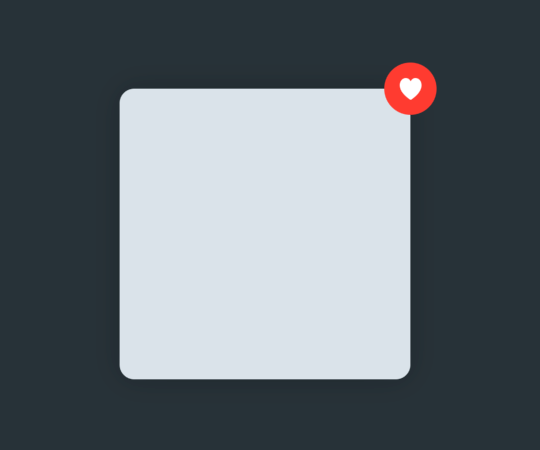
When our content is double-tapped, we want to display the like overlay in the top right hand corner. First we have to create it.
func body(content: Content) -> some View {
    content
    .overlay(
        Image(systemName: "heart.fill")
            .resizable()
            .foregroundColor(.white)
            .frame(width: 15, height: 15, alignment: .center)
            .padding(10.5)
            .background(Color.red)
            .cornerRadius(18)
            .offset(x: 18, y: -18)
    , alignment: .topTrailing)
}
Tracking User Interaction
Now comes the fun part. We can't show the overlay until the user double taps the content. To keep track of this we need to add a @State variable called liked.
@State var liked: Bool = falseThen in our body function update the content to have a TapGesture that accepts 2 taps before it fires. Then when it does, flip the value of the liked value.
func body(content: Content) -> some View {
        content
        .overlay(
            Image(systemName: "heart.fill")
                .resizable()
                .foregroundColor(.white)
                .frame(width: 15, height: 15, alignment: .center)
                .padding(10.5)
                .background(Color.red)
                .cornerRadius(18)
                .offset(x: 18, y: -18)
        , alignment: .topTrailing)
        .gesture(
            TapGesture(count: 2)
                .onEnded({
                    withAnimation {
                        self.liked = !self.liked
                    }
                })
        )
    }
Animating the Overlay
Now that we're tracking the state of our content through the liked variable, we can hide and display the view. To do this, we're going to use a combination of scaleEffect and opacity. Add these functions to the end of our overlay.
.opacity(self.liked ? 1.0 : 0)
.scaleEffect(self.liked ? 1.0 : 0, anchor: .center)
.animation(.easeIn(duration: 0.2))
Now go to your project's ContentView.swift and test the LikeModifier using this code.
Rectangle()
    .cornerRadius(10)
    .frame(width: 200, height: 200, alignment: .center)
    .modifier(LikeModifier())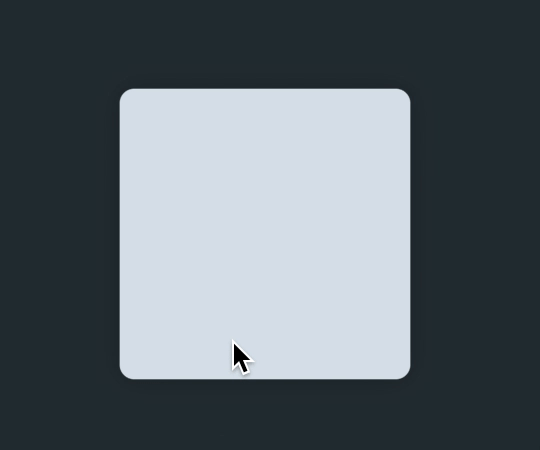
Adding a Callback
This great and all, but what use is it if you don't receive an update when the user interacts with the View? When we initialize the LikeModifier we'll pass along a function that will be called when the TapGesture is fired.
struct LikeModifier: ViewModifier {

    @State var liked: Bool = false
    var callback:()->()

    func body(content: Content) -> some View {
        content
        // ...
        // Overlay here
        // ...
        .gesture(
            TapGesture(count: 2)
                .onEnded({
                    withAnimation {
                        self.liked = !self.liked
                    }
                    // Fire the callback so we can update the model.
                    self.callback()
                })
        )
    }
}LikeModifierNow you can update your test code to this...
Rectangle()
    .cornerRadius(10)
    .frame(width: 200, height: 200, alignment: .center)
    .modifier(LikeModifier {
    	// Update model here...
    })
Extending View
If you'd like you can also extend the View class in order to make adding the LikeModifier easier.
extension View {
    func onFavorite(callback: @escaping ()->()) -> some View {
        return self.modifier(LikeModifier(callback: callback))
    }
}
By doing this, your code becomes more readable, while also cutting down on the boilerplate.
Support Future Tutorials!
Please consider subscribing using this link. If you aren't reading this on TrailingClosure.com, please come check us out sometime!
If you've built something using this tutorial, send us pics! Find us on Twitter @TrailingClosure, or email us at [email protected]